LESSON 2: Branching and remote operations#
TODO: add a short description of the lesson
Understand the concept of branches in Git repositories.
Apply Git operations to create and merge branches in a local Git repository.
Understand the concepts of bare and remote Git repositories.
Clone and push changes to remote Git repositories.
Synchronise changes between local and remote Git repositories.
Topics:
create branches merge branches remote reponsitories clone repositories push changes sync changes
Preparation#
Instructor’s Note
The instructor must have a repository with the content and state reached at the end of LESSON 1: Fundamental Operations with Git.
Recapitulation: Fundamental Git Operations#
5 min
The lesson start with a quick recap of lesson 1 and introduce lesson 2.
Instructor’s Note
Confirm the participants have a repository with at the state where lesson 1 ended
Ask participants for question related to lesson 1
Explain the schedule for this lesson 2
Episode 1: Understanding Branches#
Instructor’s Note
Ask what they understand about Branches in Git
Explain in a nushell what are Branches in Git
Memorise the new commands and the Branch where the instructor is
main*
2.1.1 Create, rename, change and delete branches#
git branch                     # new command for checking the branches (output: *main)
git branch B1                  # new argument (create new branch)
git branch                     # verify (output: B1, *main)
Your newly created branch (here, B1) will show up, but your active branch should still be main. Note that B1 is just a name. You could also call your branch delft, if you want.
Instructor’s Note
A question from students may arise: Lowercase matters?
While it’s essential to provide enough information for clarity, overly long branch names can become cumbersome and difficult to manage. Lowercase and dashes: Stick to lowercase letters and use dashes instead of spaces in branch names to ensure compatibility across different operating systems and Git hosting platforms. Show the best practices for naming Git branches.
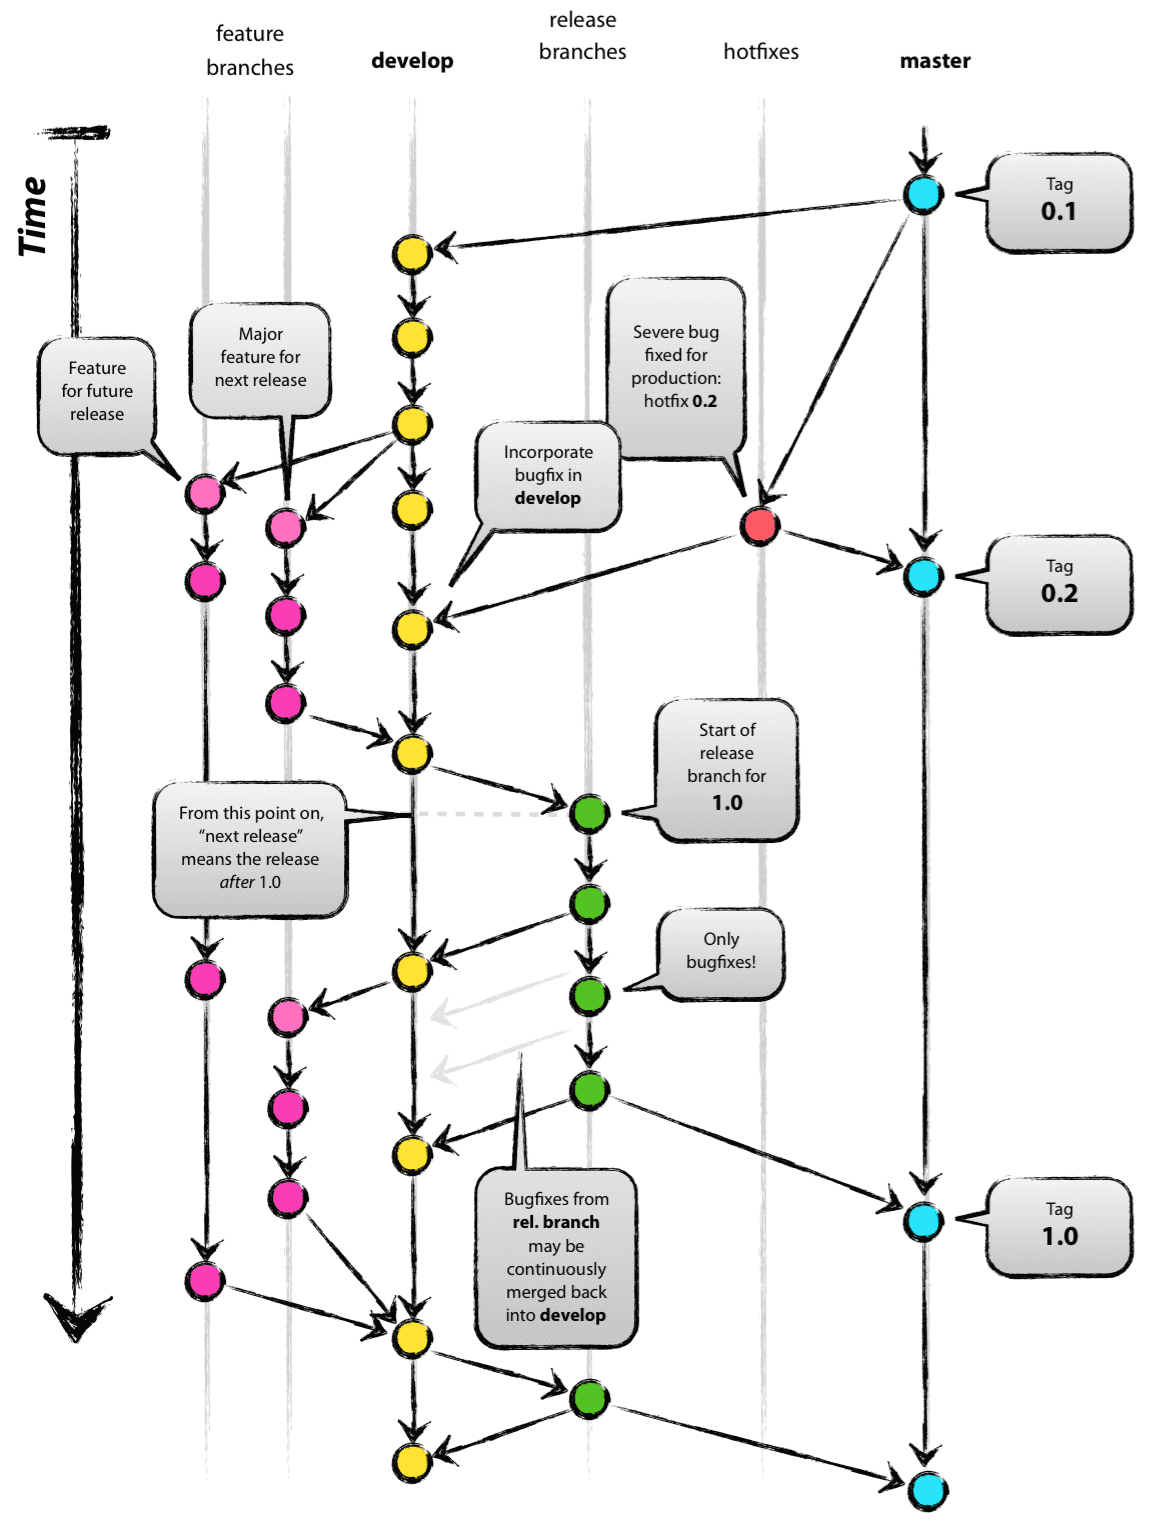
You can explain the key reason for using
branchesin the whiteboard or with the following image:
git status                     # verify (output: On branch main - nothing to commit, working tree clean)
cat Lines.txt                  # verify (ouptut: Lines.txt with eighth line)
Lets explore in our terminal with git branch --help:
-ror--remote: Lists only remote branches.-dor--delete: Deletes a specified branch. For example,git branch -d B1.-Dor--force: Force deletes a branch, even if it has unmerged changes.-mor--move: Renames a branch. For example,git branch -m old-branch new-branch.-cor--copy: Creates a new branch by copying an existing branch. For example,git branch -c existing-branch new-branch.-vor--verbose: Shows more information when listing branches, including the last commit message.
git branch -m B1 B2            # new short option (rename B1 to B2)
git log --oneline              # verify (notice that B1 is renamed to B2)
Now its time to explain the output of git log --online
c0ebedd (HEAD -> main, b2) Eighth line
c1eb703 (tag: tag1) seventh line
3005e3d Jabberwocky line 2
965e44f Modified Lines.txt
c165327 Adding .gitignore
0e77df2 Add first four lines
Once a branch has created and its not longer needed, it can be deleted. Removing branches that are no longer active helps maintain a clean and manageable branch structure. To delete a branch, you can use the git branch command, followed by a -d flag:
git branch -d B2               # new short option (output: Deleted branch B2 (was 8f14e06).)
git log --oneline              # verify (notice that main is the only branch available)
git branch -m main foo       # known action (rename "main" to "foo" branch)
Instructor’s Note
A question from students may arise: is kind of best practices modifying main branch name?
If there is a specific organizational reason, renaming the
mainbranch is a good practice as long as it is done thoughtfully with clear communication and updates to all reserch infrastructure and systems, following internal convetions and widely adopted practices within the community. However, if the repository is already well-established and widely used with themainbranch name, the impact of renaming might outweigh the benefits. Show the best practices for naming Git branches.*
git log --oneline              # verify
git branch -d foo              # known action (fails)
This should output similar to:
error: Cannot delete branch 'foo' checked out at '/Users/courses/gitcodev/2310-gitcodev/git/lesson2'
In Git, every repository has a current branch that your working directory is using. This is known as the checked-out branch.
git branch -m foo main         # known action (replace "foo" to "main")
git branch                     # verify
Instructor’s Note
Few recommendations to discuss and recap with students:
Checked-out branch: The branch you’re currently working on.
You can’t delete the branch you’re on because Git needs to keep a reference to your working directory.
You must always specify the target branch when using
git switch. Without a branch name or commit hash, Git doesn’t know what to switch to, hence the error.git switchis a modern alternative to the older gitcheckoutfor branch operations, and it’s more intuitive for switching branches.
git status                     # verify
git log --oneline              # verify
git branch B1                  # known action (create again new branch B1)
git branch                     # verify
git log --oneline              # verify
Lets now change branches with git switch git command.
git switch # new commmand (fails - fatal: missing branch or commit argument)
git switch B1 # new argument: on branch B1
Instructor’s Note
Understanding the A:
The letter
Astands for “Added”. This indicates that these files have been added to the staging area (also known as the index) in Git. The staging area is where you prepare changes before committing them to the repository.
Removing Tracking from B1:
git rm --cached directory/dontrackme.txt
git rm --cached directory/emptyfile
git log --oneline              # verify
git branch B2                  # known action
git log --oneline              # verify
git switch B2                  # known action: on branch B2
git log --oneline              # verify
git switch main                # known action: on branch main
git log --oneline              # verify
Exercise 2.1 — Get familiar with branches
Get familiar with branches
5 min
Please perform the following tasks individually.
Revise the commands we have used so far
Create at least three branches with any name you like, using…
Rename them and switch between them at your pleasure, using…
Check the status message and the history in each branch you are in, using…
At the end:
If you have a banch
master, rename it asmainReturn to the branch
mainDelete all other branches, using…
Formulate your explanation of what you have observed. The following questions are two sides of the same coin:
What did you ask Git to do?
What did Git do for you?
Instructor’s Note
DO NOT change content and name of the file
DO NOT stage and commit changes
Answers
git branch
# verify
git branch -d B1 B2
# known action
git branch
# verify
git log --oneline
# verify
cat Lines.txt
2.1.2 Develop and compare branches#
After the exercise, lets create the following actions in git:
git status                                                      # observe (nothing to commit, working tree clean)
git branch B1                                                   # known action
git branch B2                                                   # known action
git branch                                                      # on branch main
git status                                                      # routine with git status
echo 'ninth line' >>Lines.txt                                   # routine with git status
git status                                                      # routine with git status
git add Lines.txt                                               # routine with git status
git status                                                      # routine with git status
The output you should get is as following:
On branch main
Changes not staged for commit:
  (use "git add <file>..." to update what will be committed)
  (use "git restore <file>..." to discard changes in working directory)
	modified:   Lines.txt

no changes added to commit (use "git add" and/or "git commit -a")
git commit -m 'Add ninth line on main' Lines.txt # output: [main 0e85a39] added ninth line 1 file changed, 1 insertion(+)
git status                                                      # output: On branch main nothing to commit, working tree clean
git log --oneline                                               # verify
git status                                                      # verify
Lets go back to branch B1:
git switch B1                                                   # on branch B1
git status                                                      # verify (nothing to commit, working tree clean)
git log --oneline                                               # verify
git log --oneline --all                                         # new long option
cat Lines.txt                                                   # verify
The output of Lines.txt should display:
first line
second line
third line
fourth line
sixth line
seventh line
eighth line
Lets add the ninth line on the Lines.txt:
git status                                                      # routine with git status
echo 'ninth line' >>Lines.txt                                   # routine with git status
git status                                                      # routine with git status
git add Lines.txt                                               # routine with git status
git status                                                      # routine with git status
git commit -m 'Add ninth line on B1' Lines.txt                  # routine with git status
git status                                                      # routine with git status
git log --oneline                                               # verify
git log --oneline --all                                         # verify
git log --oneline --all --parents                               # new long option
Now, we switch to the main branch:
git switch main                                                 # on branch main
git log --oneline --all                                         # verify
The output of the git log --oneline --all command provides a concise view of the commit history across all branches in your Git repository. Let’s break down what each part of the following output means:
b90bce0 (b1) add ninth line on B1
f6ef1b3 (HEAD -> main) add ninth line on main
This output suggests that the branches b1 and main both have separate commits, and the HEAD is currently pointing to the main branch.
  b1                main (HEAD)
  |                  |
b90bce0           f6ef1b3
(add ninth       (add ninth
 line on B1)      line on main)
In this case, the commit on b1 differs from the commit on main, even though both commits have similar descriptions.
Lets suppose we added a new line by mistake:
echo 'ninth line (duplicate)' >> Lines.txt                      # routine (an intended mistake)
git add Lines.txt                                               # routine
git commit -m 'Add tenth line on main (with mistake)' Lines.txt # routine
cat Lines.txt                                                   # verify
The following output should be displayed:
❯ cat Lines.txt
first line
second line
third line
fourth line
sixth line
seventh line
eighth line
ninth line
ninth line(duplicate)
2.1.3 Visualise and merge branches, and conflict resolution#
Instructor’s Note
The objectives of this section is to:
Show participants how to identify what has been changed in a file between commits.
Explain the meaning of each part of the diff output, including how to interpret the context of changes.
Teach participants how to merge branches and handle conflicts.
Git also offers an option for visualization of branches inside the command line. For that you can use git log (introduced in the previous chapter on Git Essentials) with four flags:
git log --oneline --all                                # explore
git log --oneline --all --parents                      # explore
git log --oneline --all --parents --graph              # explore
Below is the output:
* c5d261c 9122e5b (HEAD -> main) add tenth line on main (with mistake)
* 9122e5b c0ebedd add ninth line on main
| * 3730df7 c0ebedd (b1) added ninth line on B1
|/
* c0ebedd c1eb703 (b2) Eighth line
* c1eb703 3005e3d (tag: tag1) seventh line
* 3005e3d 965e44f Jabberwocky line 2
* 965e44f c165327 Modified Lines.txt
* c165327 0e77df2 Adding .gitignore
* 0e77df2 Add first four lines
git log --oneline --all --graph --decorate # any change?
Instructor’s Note
Use --decorate when you want to quickly understand which commits belong to which branches or tags. It’s particularly helpful when working on repositories with multiple branches and tags, as you can immediately see where each branch or tag is positioned in the commit history.
We should now focus on the output! Lets change the branch now to B1:
git switch B1                                          # on branch B1
cat Lines.txt                                          # verify (Lines.txt should be without duplicate ninth line)
Lets add the tenth line on the Lines.txt file to show a case of conflict:
echo 'tenth line on B1' >> Lines.txt                   # routine
git add Lines.txt                                      # routine
git commit -m 'Add tenth line on B1' Lines.txt         # routine
git log --oneline --all --graph                        # verify
Lets now switch to the main branch:
git switch main # on branch main
Before committing the changes, we should review differences between versions of the files using git diff
git diff HEAD HEAD~1 Lines.txt # Show changes in Lines.txt between the latest commit and the previous commit
The output from the command git diff HEAD HEAD~1 Lines.txt shows the differences between the current commit (HEAD) and the previous commit (HEAD~1) for the file Lines.txt.
git diff main B1 Lines.txt                             # Show changes in Lines.txt between the main branch and branch B1
git diff main B1~1 Lines.txt                           # Show changes in Lines.txt between the main branch and the parent of the latest commit on branch B1
git diff main~1 B1~1 Lines.txt                         # Show changes in Lines.txt between the parent of the latest commit on the main branch and the parent of the latest commit on branch B1
git log --oneline --all --graph                        # Display a graph of the commit history for all branches in a concise format
git status                                             # verify
nano Lines.txt                                         # edit file to fix mistake
cat Lines.txt                                          # verify
git status                                             # verify
git add Lines.txt                                      # routine
git commit -m  'Correct tenth line on main' Lines.txt  # routine
git log --oneline --all --graph                        # routine
cat Lines.txt                                          # verify
Exercise 2.2 — Explore differences across branches
Explore differences across branches
10 min
Please perform the following tasks individually
Move to branch B2
Inspect several previous versions in the history using
git diffwith appropriate argumentsRepeat at your own pleasure
See how far back in the history of another branch you can go!
Formulate your explanation of what you have observed The following questions are two sides of the same coin:
What did you ask Git to do?
What did Git do for you?
Answers
# sol. ex1
git switch B2 sol ex.1
# sol. ex2
git diff HEAD~1
git diff HEAD~2
git diff HEAD~3
# sol. ex3
git diff HEAD~4
git diff HEAD~5
Exercise 2.3 — Commit in a secondary branch
Commit in a secondary branch
5 min
Please perform the following tasks individually
Stay in (or go to) branch B2 (the file Lines.txt contains eight lines)
Append a ninth and a tenth line in the usual way
Make a single commit of these two changes. Specify the branch name in the commit message!
Inspect the working tree
Formulate your explanation of what you have observed The following questions are two sides of the same coin:
What did you ask Git to do?
What did Git do for you?
Answers
  git switch B2                                             # on branch B2
  cat Lines.txt                                             # verify
  echo 'ninth line' >>Lines.txt                             # routine
  echo 'tenth line' >>Lines.txt                             # routine
  git add Lines.txt                                         # routine
  git commit -m 'Add ninth and tenth line on B2' Lines.txt  # routine
  git status                                                # verify
  git log --oneline --all --graph                           # verify
Lets keep going and come back to branch B1:
git switch B1                                             # on branch B1
echo 'eleventh line' >>Lines.txt                          # routine
echo 'twelfth line' >> Lines.txt                          # routine
git diff                                                  # routine
git add Lines.txt                                         # routine
git commit -m 'Add 11th and 12th lines on B1' Lines.txt   # routine
git log --oneline --all --graph                           # routine
We now move back to main branch:
git switch main                                           # on branch main
git diff main B1 Lines.txt                                # verify
git merge -m 'Merge development from branch B1' Lines.txt # wrong syntax
Here is the output:
❯ git merge -m "merge development from branch b1" Lines.txt
merge: Lines.txt - not something we can merge
This Lines.txt in the previous git merge command is incorrectly specified as the target to merge. Git expects a branch name here, not a file. To merge changes from branch B1 into the current branch (e.g., main), you should use the branch name, not a file name. But lets explore another error:
git merge -m 'Merge development from branch B1' # wrong syntax
To merge changes from a specific branch (e.g., B1) into the current branch, you need to specify the branch name:
git merge -m 'Merge development from branch B1' B1 # right syntax: fails because of conflict
During a merge conflict, you can run git status to see which files are in conflict:
On branch main
You have unmerged paths.
  (fix conflicts and run "git commit")
  (use "git merge --abort" to abort the merge)

Unmerged paths:
  (use "git add <file>..." to mark resolution)
	both modified:   Lines.txt

no changes added to commit (use "git add" and/or "git commit -a")
You can also check the different file versions with diff
git diff Lines.txt # verify
To resolve the merge conflict, you need to manually edit the conflicting sections to the desired state, removing the conflict markers. You might want to keep some changes from your current branch, some from the merged branch, keep only the changes from one branch, or make entirely new changes.
cat Lines.txt                                             # explore
nano Lines.txt                                            # edit the file within the conflict decorations
In this example, the conflict has been resolved by mixing both sets of changes. Parts of the changes from both branches are now present in the file. If you are done you can use git add to stage the resolved changes:
cat Lines.txt                                             # verify
git diff                                                  # verify
git status                                                # verify
git add Lines.txt                                         # mark resolution
git status                                                # verify
git commit -m 'Merge changes from B1 into main' Lines.txt # conclude merge wrong syntax
git commit -m 'Merge changes from B1 into main'           # conclude merge right syntax
cat Lines.txt
git status                                                # verify
git log --oneline --all --graph                           # verify
git log --oneline --all --graph --parents                 # verify
Exercise 2.4 — A first type of merge
A first type of merge
10 min
Please perform the following tasks individually
How many more lines has Lines.txt in B2 than in main?
Please merge B2 in main
Verify the outcome with a graphed git log
Attention
DO NOT merge B2
DO NOT delete branches
Formulate your explanation of what you have observed The following questions are two sides of the same coin:
What did you ask Git to do?
What did Git do for you?
Answers
```shell
# sol. ex.1
git switch B2
wc -l Lines.txt
git switch main
wc -l Lines.txt
# sol. ex.2
git switch main
git merge B2
# sol. ex.3
git log --oneline --graph --decorate --all
```
Episode 2: Understanding operations with remotes#
2.2.1 Create and explore a bare repository#
pwd                           # Print the current working directory
cd ..                         # Change to the parent directory (directory of the workshop)
pwd                           # Verify the current working directory
ls -F                         # List files and directories with a trailing '/' for directories
git init --bare git-zero.git  # Initialize a new bare Git repository named git-zero.git
ls -F git-zero.git            # Verify the creation of the bare repository by listing its contents
ls -Fa git                    # List all files and directories, including hidden ones, in the git directory
ls -Fa git/.git               # List all files and directories, including hidden ones, in the .git directory of the git repository
cd git-zero.git               # Change to the directory of the bare repository
ls                            # List all files and directories in the bare repository
The following output should be displayed in your terminal:
./           HEAD         description  info/        refs/
../          config       hooks/       objects/
The .git directory is the heart of your repository, containing everything Git needs to manage and track changes in your project.
Lets try to write:
git status # observe (fails)
Another error:
git log # observe (fails)
git branch                    # observe its empty
cd ..                         # observe
ls                            # verify
2.2.2 Cloning and pushing to “remote” bare repositories (upstreams)#
This command clones the bare repository git-zero.git into a new directory named git-one.
git clone git-zero.git git-one # new command
You should get the following output:
❯ git clone git-zero.git git-one
Cloning into 'git-one'...
warning: You appear to have cloned an empty repository. done.
ls -Fa git-one                                    # observe
ls -Fa git-one/.git                               # observe
ls -F                                             # observe
cd git-one                                        # directory of the first clone
git status                                        # nothing to commit
git branch                                        # observe that is empty
git log                                           # observe (fatal: your current branch 'main' does not have any commits yet)
The git remote command is used to manage the set of repositories (“remotes”) whose branches you track. These remotes are typically other repositories that you can fetch from and push to.
Instructor’s Note
The following key functions of git remote can be explained to students:
Fetching:Fetching from a remote repository means downloading new data (commits, branches, or tags) from that remote repository into your local repository.
This allows you to see changes made by other collaborators without affecting your working directory until you decide to merge or integrate the changes.
Pushing:Pushing to a remote repository means uploading your local commits to the remote repository.
This is how you share your changes with others who are working on the same project.
git remote                                        # new command
git remote -v                                     # new short option
The command git remote lists the short names of all configured remote repositories. When you run git remote and see origin, it means that there is a remote repository configured with the name origin.
origin	/Users/user/Desktop/2024-gitcodev/git-zero.git (fetch)
origin	/Users/user/Desktop/2024-gitcodev/git-zero.git (push)
echo 1 >> numbers.txt                              # routine
cat numbers.txt                                   # verify
git status                                        # routine with git status (untracked file: numbers.txt)
git add numbers.txt                               # routine with git status
git status                                        # routine with git status (changes to be commited: numbers.txt)
git commit -m 'git-one: add first 1' numbers.txt  # routine with git status
git log --oneline                                 # verify
git status                                        # verify (ignore the but-warning)
git push # new command
This is the expected output after git push:
Enumerating objects: 3, done.
Counting objects: 100% (3/3), done.
Writing objects: 100% (3/3), 234 bytes | 234.00 KiB/s, done.
Total 3 (delta 0), reused 0 (delta 0), pack-reused 0
To /Users/ccugutrillague/Documents/courses/gitcodev/2310-gitcodev/git/git-zero.git
 * [new branch]      main -> main
git status # verify
cd ../git-zero.git                                # directory of the upstreamgit
git status                                        # observe (fails)
git log                                           # observe
ls -F                                             # observe
cd ..                                             # in the workshop directory
pwd                                               # verify
git clone git-zero.git/ git-two                   # known action
ls -F                                             # verify
cd git-two/                                       # in the second clone
ls -aF                                            # verify
cat numbers.txt                                   # observe
git log                                           # observe
git remote -v                                     # observe
echo 2 >>numbers.txt                              # routine
cat numbers.txt                                   # verify
git add numbers.txt                               # routine
git commit -m 'git-two: add first 2' numbers.txt  # routine
git log --oneline                                 # verify
git push                                          # known action
git status                                        # verify
2.2.3 Fetching and merging (pulling) from upstreams#
The git fetch command is used to download commits, files, and references from a remote repository into your local repository. It updates your local copy of the remote branches without modifying your working directory or local branches.
cd ../git-one                                      # Change to the directory of the first clone
pwd                                                # Verify the current working directory
git status                                         # Verify the status of the working directory
git log --oneline                                  # View the commit history in a concise format
git fetch                                          # Fetch updates from the remote repository
The below code is the expected output of the last command:
remote: Enumerating objects: 5, done.
remote: Counting objects: 100% (5/5), done.
remote: Total 3 (delta 0), reused 0 (delta 0), pack-reused 0
Unpacking objects: 100% (3/3), 238 bytes | 238.00 KiB/s, done.
From /Users/ccugutrillague/Desktop/2024-gitcodev/git-zero
   fa26574..88ee05e  main     -> origin/main
git status                                         # routine
git log --oneline                                  # routine
git log --oneline --all                            # routine
cat numbers.txt                                    # routine
# git pull = git fetch + git merge                 # git has compound commands
git fetch                                          # known action
git merge                                          # see episode 2.1 (no conflict here)
git log --all                                      # verify
cat numbers.txt                                    # verify
echo 1 >>numbers.txt                               # add another 1
cat numbers.txt                                    # routine
git add numbers.txt                                # routine
git commit -m 'git-one: add second 1' numbers.txt  # routine
git log --oneline --all                            # verify
git status                                         # verify
git push                                           # known action
git status                                         # verify
git log --oneline --all                            # verify
2.2.3 (continued) Resolving conflicts when pushing#
cd ../git-two/                                     # in the directory of the second clone
ls                                                 # observe
cat numbers.txt                                    # observe
git status                                         # observe
git log --oneline                                  # observe
echo 2 >>numbers.txt                               # routine
cat numbers.txt                                    # verify
git add numbers.txt                                # routine
git commit -m 'git-two: add second 2' numbers.txt  # routine
git status                                         # verify
git log --oneline                                  # verify
git push                                           # known action with conflict
Expected git push output:
The error message you received when running git push indicates that your push was rejected because the remote repository contains commits that are not present in your local repository. This situation typically arises when someone else has pushed changes to the remote repository that you do not have locally.
The reason for rejection is that you need to fetch the latest changes from the remote repository first.
git fetch                                          # Fetch updates from the remote repository
git status                                         # Check the status of the working directory
git merge                                          # Merge the fetched changes into your current branch
git diff # Show the differences and conflicts
The output of the git diff command with diff --cc indicates a merge conflict in the numbers.txt file. This happens when Git tries to merge two branches (or commits) that have changes to the same part of the file, and Git cannot automatically resolve the differences.
diff --cc numbers.txt
index 2ca3cd5,e13c5bf..0000000
--- a/numbers.txt
+++ b/numbers.txt
@@@ -1,3 -1,3 +1,7 @@@
  1
  2
++<<<<<<< HEAD
 +2
++=======
+ 1
++>>>>>>> refs/remotes/origin/main
Instructor’s Note
You can ask students about the current situation
In your local branch (the current HEAD), you added a second 2 to numbers.txt (resulting in two lines with 2).
In the remote origin/main branch, a 1 was added to the file (which conflicts with your changes).
You can ask students how should we resolve this conflict
To resolve this, you need to manually edit the numbers.txt file and decide which change to keep. You have three options:
Keep your changes from the local branch (HEAD): Remove the conflict markers and keep the changes from your branch (+2).
Keep the remote changes from origin/main: Remove the conflict markers and keep the changes from the remote (+1).
Combine both changes: Modify the file to include both changes in a way that makes sense.
cat numbers.txt                                    # View the contents of numbers.txt
nano numbers.txt                                   # Edit the file to resolve the conflict
cat numbers.txt                                    # Verify the resolved contents of numbers.txt
git status                                         # Verify the status of the working directory
git add numbers.txt                                # mark resolution
git status                                         # verify
git commit -m 'git-two: conclude merge'            # conclude merge
git status                                         # verify
git log --oneline                                  # verify
git push                                           # known action
git log --oneline                                  # verify
git status                                         # verify
Exercise 2.5 — Another type of merge
Another type of merge
Please perform the following tasks individually
Please merge B2 in main
If a conflict arises, make choices of your liking
Verify the outcome with a graphed git log
Attention
DO NOT delete branches (for the purpose of this workshop)
Formulate your explanation of what you have observed The following questions are two sides of the same coin:
What did you ask Git to do?
What did Git do for you?
Answers
```shell
# sol. ex.1
git switch B2
git merge B2
# sol. ex.2
# make the changes in the file, then:
git commit
wc -l Lines.txt
# sol. ex.3
git log --oneline --graph --decorate --all
```
Lesson Summary#
5 min
TODO: add a summary of the episode with the main takeaways and concepts learned.